Lusch Motors Ajax readme
Thank you for buying the Lusch Motors Ajax. Read this readme to find out everything about your new vehicle.
Log
Log
- v1.1 (31-08-2023)
Major update: fixed sim crossing issues, added GMLS, GLPS, cruise control/speed limiter, other QOL fixes - v1.03 (07-01-2023): Added GMLS scripting, gmls_id: Lusch Motors Ajax
For heavily modified vehicles: you can copy the 'NTBI GMLS Vehicle Sample Script Rev. 3' script from the updated version to your current, modified, vehicle - v1.02 - August 24th 2019
Minor bug fixes: internal communication scripts, light texture scripts, handling flags, camera script - v1.01 - July 10th 2019
Rebalanced heating/cooling/damage
Fixed FX issues - v1.0 - July 9th 2019
First release
General instructions
Basics
Cruise Control / Speed limiter
- Cruise control: You can engage CC by tapping W/Up key when in one of forward gears. System will be disengaged when you touch W/Up key again, or brake. You can select your desired speed using buttons on UniHUD, or by going to vehicle's menu, "Vehicle" - "SpeedLimit+"/"SpeedLimit-".
- Speed limiter: You can engage speed limit by tapping the gear up key when in one of forward gears. Disengage the speed limited by shifting up again. You can select your desired speed limit using buttons on UniHUD, or by going to vehicle's menu, "Vehicle" - "SpeedLimit+"/"SpeedLimit-".
HUD
The Lusch Motors Ajax comes with the GEMC UniHUD. Touch the vehicle to bring up the menu and click the 'get HUD' button to receive it. Read more about the UniHUD.
Menu
Touch the Ajax to bring up the menu. Go to Vehicle to change the vehicle settings:
- Fuel: The Ajax uses GFS diesel fuel. Get your free fuel pump or gas can here. You can turn the fuel system on and off: go to the menu --> Vehicle --> Fuel System
- Engine: Touch the ignition key to turn the engine on and off.
- Gears: the Ajax comes with an automatic gearbox. To change the driving mode, use the E/C or PageUp/PageDown buttons.
- Passengers: there's place for 1 passenger in the Ajax. Right click the passenger door and select 'drive' from the pie menu to sit in the passenger seat.
Cruise Control / Speed limiter
- Cruise control: You can engage CC by tapping W/Up key when in one of forward gears. System will be disengaged when you touch W/Up key again, or brake. You can select your desired speed using buttons on UniHUD, or by going to vehicle's menu, "Vehicle" - "SpeedLimit+"/"SpeedLimit-".
- Speed limiter: You can engage speed limit by tapping the gear up key when in one of forward gears. Disengage the speed limited by shifting up again. You can select your desired speed limit using buttons on UniHUD, or by going to vehicle's menu, "Vehicle" - "SpeedLimit+"/"SpeedLimit-".
HUD
The Lusch Motors Ajax comes with the GEMC UniHUD. Touch the vehicle to bring up the menu and click the 'get HUD' button to receive it. Read more about the UniHUD.
Menu
Touch the Ajax to bring up the menu. Go to Vehicle to change the vehicle settings:
- Connect HUD: to (re)connect to the UniHUD, use this feature
- Diag data: shows vehicle data in chat
- Bad roads fix: use this setting when you can't drive certain mesh roads
- Set name: change the vehicle's name
- Handbrake: enable or disable the automatic handbrake. Useful when stopping on a hill
- Fuel system: turn the fuel system on or off
- Limiter/cruise: switch between a speed limiter or cruise control
- SpeedLimit+/SpeedLimit-: increase or decrease the speed limit
- Turn ratio: change the turn radius, useful for urban sims with many 90 degree turns
- Auto shut off: turn this off to leave the engine running when exiting the vehicle
- Reverse cam: enable the automatic reverse camera when shifting to the reverse gear, useful for parking
Customization
The Ajax is fully modifiable. A lot of customizations can be done through the menu to minimize the risk of breaking things. Touch the vehicle to bring up the menu:
1. Body textures (colors/themes)
The Ajax comes with a number of premade uniform body colors and themes
2. Details
3. Wheels
The tire tread can be changed. Choose between highway or offroad.
4. Interior
5. Back addon
Change the settings of the attached back addon. For a custom addon texture find the templates here and follow the instructions. For more information about the addons: see below.
6. Decals
The Ajax comes with one decal spot: on the doors. Apply or remove the decal here.
7. Custom body (livery) texture
You can apply your own, unique body texture. Find the templates here and follow the instructions.
8. Plates
1. Body textures (colors/themes)
The Ajax comes with a number of premade uniform body colors and themes
2. Details
- Deflector: show/hide the wind deflector
- Mirrors: show/hide mirrors on the bonnet
- Visor: show/hide sun visor
- Plastic/Chrome trim: switch between a plastic or chrome trim on the side mirrors
- Grille: change the grille style
- Work lights: show/hide the work lights [these lights can be edited in edit mode, see below]
- Beacons: show/hide the rotating beacon light [these lights can be edited in edit mode, see below]
- ICC Bumper: show/hide the rear ICC bumper
- Mudflap: show/hide the rear mudflap
3. Wheels
The tire tread can be changed. Choose between highway or offroad.
4. Interior
- Color: choose the base color
- Trim: change the dashboard trim
- Seats: choose a seat color
5. Back addon
Change the settings of the attached back addon. For a custom addon texture find the templates here and follow the instructions. For more information about the addons: see below.
6. Decals
The Ajax comes with one decal spot: on the doors. Apply or remove the decal here.
7. Custom body (livery) texture
You can apply your own, unique body texture. Find the templates here and follow the instructions.
8. Plates
- Size: switch between European or US sized plates: go to the menu --> Customize --> Plates --> EU/US size
- Text/letters: you can set your own text and/or letters on the plate: go to the menu --> Customize --> Plates --> CustomPlate. Type the text/letters you want on your plate. There's a limit of 7 characters
- Text/letters color: change the color of the custom text/letters: go to the menu --> Customize --> Plates --> Plates color. Choose any of the present colors or add your own.
- Background picture: Apply your own licenseplate texture: go to the menu --> Customize --> Plates --> Image EU / Image US. Use the texture's UUID.Details
Editing
We've tried to make this vehicle as bullet-proof as possible, but given it's modifable nature, there might be certain cases in which it will fail to perform properly after being modified unprofessionally. Such cases are eligible for receiving customer support at our discretion.
IMPORTANT:
Please turn "EDIT MODE" on before any modifying that isn't reflected in vehicle's "Customize..." menu.
EDIT MODE can be turned on and off in the main menu (just click the vehicle).
Check out the quickstart guides
Modifying wheels
Change wheel description to one of the following:
Lights and illumination
Work lights can be copied to any place of your truck. Additionally you can modify settings of each individual light by changing name field parameters:
Beacons can be also copied to any place of your truck. Make sure you don't copy just the beacon, but also the rotator prim(s), as these are the ones you need to make beacon actually work. You can change the number of rotators on individual beacon by disposing extra, or linking additional ones. (however we recommend staying between 1 and 2 rotator prims per single beacon, to have either 1 or 2 way light).
You can change each beacon's settings by modifying its name field parameters:
To change the beacon light color, just change color on beacon's glass.
Excluding parts
Say, you don't want a certain part to play its original function - for example you want to turn one of the wheels you copied into a spare tire. To do so, simply erase description on that prim, it will effectively exclude it from any lists. Same goes for other parts, like if you want to have a custom license plate next to your windshield, but don't want it to change anymore when you change your plates, and so on.
Wheelbase and turning radius
Turning radius of this vehicle is defined by its wheelbase, which is the furthest distance between the wheels of the truck. Move the wheels closer together, and your wheelbase will shrink, making turning radius smaller. Move wheels further apart, and it will extend, making cornering harder.
If you have a set of tag wheels mounted in the back(WHEEL_T in wheel description), having them on the ground will increase the wheelbase, and lifting them up with a button on UniHUD will make wheelbase shorter, so the truck turns easier.
IMPORTANT:
Please turn "EDIT MODE" on before any modifying that isn't reflected in vehicle's "Customize..." menu.
EDIT MODE can be turned on and off in the main menu (just click the vehicle).
Check out the quickstart guides
Modifying wheels
Change wheel description to one of the following:
- WHEEL_S - to make them steerable;
- WHEEL_D - to turn them into driving wheels;
- WHEEL_T - to make them tag wheels;
- Wheel size - you can change wheel size freely, but in extreme cases you'll have to to adjust collider prims as well(see below).
- Ride height - move two collider prims located under the truck(use transparency highlighting - Ctrl Alt T) to make it sit higher or lower.
Lights and illumination
Work lights can be copied to any place of your truck. Additionally you can modify settings of each individual light by changing name field parameters:
- 1st: boolean(0 or 1) - makes light project light if 1;
- 2nd: float(0.0 - 1.0 range) - glow strength;
- 3rd: float(0.0 - 1.0 range) - light intensity;
- 4th: float(0.0 - 20.0 range) - light radius;
- 5th: float(0.0 - 1.0 range) - light falloff;
- 6th: vector(<0,0,0> - <1,1,1> range) - light color.
Beacons can be also copied to any place of your truck. Make sure you don't copy just the beacon, but also the rotator prim(s), as these are the ones you need to make beacon actually work. You can change the number of rotators on individual beacon by disposing extra, or linking additional ones. (however we recommend staying between 1 and 2 rotator prims per single beacon, to have either 1 or 2 way light).
You can change each beacon's settings by modifying its name field parameters:
- 1st: boolean(0 or 1) - makes light project light if 1;
- 2nd: float(0.0 - 1.0 range) - glow strength;
- 3rd: float(0.0 - 1.0 range) - light intensity;
- 4th: float(0.0 - 20.0 range) - light radius;
- 5th: float(0.0 - 1.0 range) - light falloff;
- 6th: integer(-n - n range) - beacon rotation direction and speed;
To change the beacon light color, just change color on beacon's glass.
Excluding parts
Say, you don't want a certain part to play its original function - for example you want to turn one of the wheels you copied into a spare tire. To do so, simply erase description on that prim, it will effectively exclude it from any lists. Same goes for other parts, like if you want to have a custom license plate next to your windshield, but don't want it to change anymore when you change your plates, and so on.
Wheelbase and turning radius
Turning radius of this vehicle is defined by its wheelbase, which is the furthest distance between the wheels of the truck. Move the wheels closer together, and your wheelbase will shrink, making turning radius smaller. Move wheels further apart, and it will extend, making cornering harder.
If you have a set of tag wheels mounted in the back(WHEEL_T in wheel description), having them on the ground will increase the wheelbase, and lifting them up with a button on UniHUD will make wheelbase shorter, so the truck turns easier.
Addons
Addons
Box
Flatbed
Tanker
Wrecker
Garbage
Box
- Resizing: OK!
- You can open/close doors, and pick cargo type (there's 3 pre-made cargos in individual prims, you can copy those to increase number of visual cargo (up to 5 is supported by GTFO setup);
- In terms of customization, there's a number of pre-made liveries for the box with an ability to add your custom textures, AC unit that can be hidden or shown in the front, and toggleable side illumination (please use emissive mask on your custom textures to experience its full potential).
Flatbed
- Resizing: OK!
- You can open/close sides, and pick cargo type (there's 3 pre-made cargos in individual prims, you can copy those to increase number of visual cargo (up to 5 is supported by GTFO setup));
Tanker
- Resizing: OK!
- You can open/close the side compartment, pick signs, and change graphics (there's a number of pre-made liveries as well as a custom texture input option). GTFO is all-time enabled.
Wrecker
- Resizing: You can resize the back to make the build shorter or longer, but please don't resize boom and fork.
- Lower the boom and the fork using UniHUD controls, then align your wrecker truck with the vehicle you're planning to tow (align it to its front or back), and then hit "Winch" button on UniHUD, or click the rope on the truck.
- Once connected, you can use boom controls to lift the vehicle. To release the vehicle, you must lower the boom all the way to the ground. Once it's done, press "Winch" button on UniHUD, or click the rope on the truck, and vehicle will be released.
- Note, your truck must be physical for the towing operations. In case of the opposite, you will be presented with sound alarm and a text message saying what is currently wrong.
- Resizing: Please don't!
- Move the tipper with buttons on UniHUD. Press the accelerator to make the bed move faster. Tipper comes with 4 built-in types of bulk cargo, as well as an option to haul GTFO cargo.
- Customization options include a number of built-in colors for the tipper as well as custom texture input option, ability to add a decal on the sides, and load cover that can be hidden or shown.
Garbage
- Resizing: Please don't!
- Drive the garbage cans into the back of the garbage truck to attach them, use buttons on the side to empty them into the back and/or put back on the ground.
- Customization options for garbage back include a number of pre-made colors plus custom texture input option, and ability to add a decal on the sides.
- Each garbage can has its own menu that lets you control various things such as color, fill time, and level of access.
Using the garbage addon
|
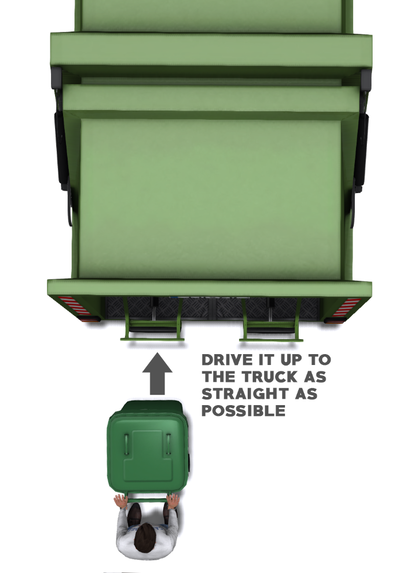
Follow these steps to empty the garbage cans using the garbage addon for the Hermes/Ajax:
1. Attach the garabage addon to the Hermes/Ajax 2. Touch the truck's cab to bring up the menu --> Vehicle --> Auto ShutOff. Make sure the menu shows that Auto ShutOff is off; the engine will keep running when you get out the cab 3. With the engine running, get out of the cab and right click the garbage can you'd like to empty 4. Right click the garbage can and select 'move' 5. Now push the garbage can towards to the back of the truck. Try to approach the truck as straight as possible. When you get in the right position, the can will be attached to the truck. This may take a few tries at first, SL's detection system can be tricky 6. With the garbage can attached to the truck, touch the blue button on the side of the truck (any blue button will do) 7. The can will no be emptied in the back of the truck. Touch the blue button again to bring the garbage can back down 8. When the process is finished, the garbage can will be released by the truck and can be moved again |
|
Credits
Modeling and textures: Owen Lusch
Scripting, sounds and animations: Beckhan Ra for GEMC
Testing: GEMC Testers group
Special thanks:
Kushino (cuuka) for RedSun (liveries)
Chaves Shu for SV Paint Works (liveries)
George Monroe
Modeling and textures: Owen Lusch
Scripting, sounds and animations: Beckhan Ra for GEMC
Testing: GEMC Testers group
Special thanks:
Kushino (cuuka) for RedSun (liveries)
Chaves Shu for SV Paint Works (liveries)
George Monroe
