Lusch Motors TRADELINE van readme
Thank you for buying the Lusch Motors Tradeline van. Read this readme to find out everything about your new vehicle.
Log
Log
- v1.12 (07-01-2023): Added GMLS scripting, gmls_id: Lusch Motors Tradeline
For heavily modified vehicles: you can copy the 'NTBI GMLS Vehicle Sample Script Rev. 3' script from the updated version to your current, modified, vehicle - v1.11 - January 20th 2021
Fixed driver seat script: seats can be moved back and forth again - v1.1 - December 15th 2020
Animation scripts updated to improve simcrossings - v1.0 - May 31st 2020
First release
General instructions
Basics
HUD
The Lusch Motors Tradeline comes with the GEMC UniHUD. Touch the vehicle to bring up the menu and click the 'get HUD' button to receive it. Read more about the UniHUD.
Menu
Touch the Tradeline to bring up the menu. Go to Vehicle tab to change the vehicle settings:
Repair
The engine can sustain damage while driving. For example when revving the engine to it's redline for a long period of time. Depending on the damage level a repair or major repair is needed.
Updating (version 1.1 and higher)
There are two ways to update your vehicle:
1. Update loader
Use the update loader to update your current vehicle. For example when you've modified it and don't want to start over. Rezz the update loader next to the vehicle you'd like to update, touch the loader and wait for the script transfer to finish
2. Fresh new version
With each update we send out a new boxed version of the vehicle. You can use this new version from that moment onwards. Alternatively you can always request a redelivery at our mainstore to receive the most recent boxed version of your vehicles.
- Fuel: The Tradeline uses GFS Diesel fuel. Get your free fuel pump or gas can here. You can turn the fuel system on and off: go to the menu --> Vehicle --> Fuel System
- Engine: Touch and briefly hold the keyfob on the dashboard to turn the engine on and off.
- Gears: the Tradeline comes with an automatic gearbox. To change the gear, use the E/C or PageUp/PageDown buttons.
- Passengers: there's place for 1 passenger in the front of the Tradeline van. Right click the passenger door and select 'drive' from the pie menu to sit in the passenger seat. The rear seats have their own sit script: hover over the seat until the mouse cursor changes to a chair icon and then click the seat.
HUD
The Lusch Motors Tradeline comes with the GEMC UniHUD. Touch the vehicle to bring up the menu and click the 'get HUD' button to receive it. Read more about the UniHUD.
Menu
Touch the Tradeline to bring up the menu. Go to Vehicle tab to change the vehicle settings:
- Connect HUD: to (re)connect to the UniHUD, use this feature
- Diag data: shows vehicle data in chat
- Bad roads fix: use this setting when you can't drive certain mesh roads
- Set name: change the vehicle's name
- Handbrake: enable or disable the handbrake. Useful when stopping on a hill
- Fuel system: turn the fuel system on or off
- Limiter/cruise: switch between a speed limiter or cruise control
- SpeedLimit+/SpeedLimit-: increase or decrease the speed limit
- Turn ratio: change the turn radius, useful for urban sims with many 90 degree turns
- Auto shut off: turn this off to leave the engine running when exiting the vehicle
- Smart Brake
Repair
The engine can sustain damage while driving. For example when revving the engine to it's redline for a long period of time. Depending on the damage level a repair or major repair is needed.
Updating (version 1.1 and higher)
There are two ways to update your vehicle:
1. Update loader
Use the update loader to update your current vehicle. For example when you've modified it and don't want to start over. Rezz the update loader next to the vehicle you'd like to update, touch the loader and wait for the script transfer to finish
2. Fresh new version
With each update we send out a new boxed version of the vehicle. You can use this new version from that moment onwards. Alternatively you can always request a redelivery at our mainstore to receive the most recent boxed version of your vehicles.
Interior vehicle controls
Many of the vehicles' functions can be controlled from the interior buttons. Find out which buttons are functional and what they control.

1. Light switch (from left to right)
Auto/off/parking/running lights/high beam
Left lever:
- Touch the left part to turn the windscreen wipers on/off
- Touch once to turn left blinker lights on, touch again to turn the lights off
- Touch and hold to turn right blinker lights on, touch again to turn the lights off
2. Button panel (from left to right, top to bottom)
Touch the keyfob to control the switch. Hold the keyfob to turn the engine on (start position).
4. Media screen
Can be used to navigate a sim or browse the web
5. Aircon control
Press the blower icons to increase or decrease the airflow in the vehicle
6. Vehicle controls (from left to right)
Auto/off/parking/running lights/high beam
Left lever:
- Touch the left part to turn the windscreen wipers on/off
- Touch once to turn left blinker lights on, touch again to turn the lights off
- Touch and hold to turn right blinker lights on, touch again to turn the lights off
2. Button panel (from left to right, top to bottom)
- Foglight (only front foglights)
- Hill brake assistance: turns the vehicles physics off when static
- AUX1: operates the beacon light (when enabled)
- Open fuel cap
- Pop the hood, touch the hood to fully open
- AUX2: operates the working lights (from the Hermes, Ajax and Scout. Not included with this vehicle
Touch the keyfob to control the switch. Hold the keyfob to turn the engine on (start position).
4. Media screen
Can be used to navigate a sim or browse the web
5. Aircon control
Press the blower icons to increase or decrease the airflow in the vehicle
6. Vehicle controls (from left to right)
- Turn the hazard lights on/off
- ECO: turn the ECO drive mode on/off. This decreases fuel use at the cost of acceleration
- Rear dome lights: turn the rear dome lights on/off
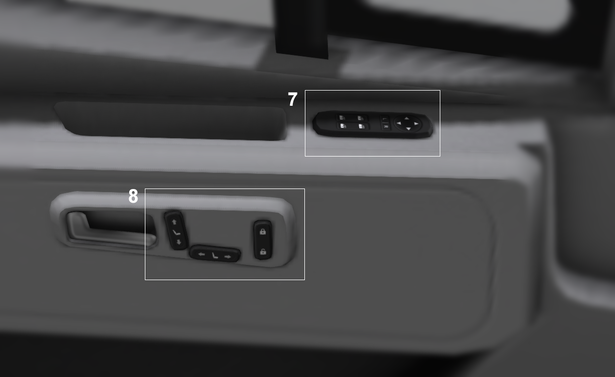
7. Window controls
8. Doors lock
8. Doors lock
Customization
The Tradeline is fully modifiable. A lot of customizations can be done through the menu to minimize the risk of breaking things. Touch the vehicle to bring up the menu and select Customize.
1. Body textures (colors/themes)
The Tradeline comes with a number of premade uniform body colors and liveries.
2. Details
3. Wheels
Switch between the different wheel styles. You can also color the wheels using one of the presets (white, grey or black) or add a custom color. Finally you can show or hide the hubcap face. We've included a very happy looking hubcap for you but please feel free to use your own.
4. Interior
5. Decals
The Tradeline comes with two decal spots: on the side doors and on the rear side windows. Apply or remove the decal here.
6. Custom body (livery) texture
You can apply your own, unique body texture. Find the templates here and follow the instructions.
8. Plates
9. Windows
Choose between a clear or dark tinted window look.
1. Body textures (colors/themes)
The Tradeline comes with a number of premade uniform body colors and liveries.
- Plain colors: uniform body colors
- w Plastic trim: uniform body colors with plastic trim on the front bumper and sides
- Themes: pre-made liveries
2. Details
- Glass/pannel: switch between glass or metal side and rear windows
- Bullbar/roof rack/side guards/rear guard/Aircon: show/hide
- it's not possible to have both the aircon and roofrack enabled at the same time
- Lighting
- Beacon: show/hide rotating roof beacon
- Strobes: show/hide strobelights
- Partition: show/hide partitioner and choose a location in the van
- Please note that every object (shelves, seat) that are in front (between driver seat and partitioner) of the partitioner are hidden
- Invert parts: similar to glass/pannel option. Switch per individual window between glass or metal
- Shelves: Show/hide shelves
- Cargo: Show/hide cargo on the shelves. Can only be shown when the shelves are active
3. Wheels
Switch between the different wheel styles. You can also color the wheels using one of the presets (white, grey or black) or add a custom color. Finally you can show or hide the hubcap face. We've included a very happy looking hubcap for you but please feel free to use your own.
4. Interior
- Color: choose floor material
- Trims: change the dashboard trim
- Seats: choose the seat material and color
5. Decals
The Tradeline comes with two decal spots: on the side doors and on the rear side windows. Apply or remove the decal here.
- The door decal has a 2:1 ratio (WxH)
- The side window decal has a 4:1 ratio (WxH)
6. Custom body (livery) texture
You can apply your own, unique body texture. Find the templates here and follow the instructions.
8. Plates
- Size: switch between European or US sized plates: go to the menu --> Customize --> Plates --> EU/US size
- Text/letters: you can set your own text and/or letters on the plate: go to the menu --> Customize --> Plates --> CustomPlate. Type the text/letters you want on your plate. There's a limit of 7 characters
- Text/letters color: change the color of the custom text/letters: go to the menu --> Customize --> Plates --> Plates color. Choose any of the present colors or add your own.
- Background picture: Apply your own licenseplate texture: go to the menu --> Customize --> Plates --> Image EU / Image US. Use the texture's UUID.Details
9. Windows
Choose between a clear or dark tinted window look.
Editing
We've tried to make this vehicle as bullet-proof as possible, but given it's modifable nature, there might be certain cases in which it will fail to perform properly after being modified unprofessionally. Such cases are eligible for receiving customer support at our discretion.
IMPORTANT:
Please turn "EDIT MODE" on before any modifying that isn't reflected in vehicle's "Customize..." menu.
EDIT MODE can be turned on and off in the main menu (just click the vehicle).
IMPORTANT:
Please turn "EDIT MODE" on before any modifying that isn't reflected in vehicle's "Customize..." menu.
EDIT MODE can be turned on and off in the main menu (just click the vehicle).
Credits
Modeling and textures: Owen Lusch
Scripting, sounds and animations: Beckhan Ra for GEMC
Testing: GEMC Testers group
Modeling and textures: Owen Lusch
Scripting, sounds and animations: Beckhan Ra for GEMC
Testing: GEMC Testers group
