Lusch Motors STELLA readme
Thank you for buying the Lusch Motors Stella. Read this readme to find out everything about your new vehicle.
Log
Log
- v1.02 (07-01-2023): Added GMLS scripting, gmls_id: LUSCH_EUROSEDAN2021_BASE
For heavily modified vehicles: you can copy the 'NTBI GMLS Vehicle Sample Script Rev. 3' script from the updated version to your current, modified, vehicle - v1.01 - August 12th 2021
updated body UV, reuploaded body template, minor allround fixes - v1.0 - August 3rd 2021
First release
General instructions
Basics
HUD
The Lusch Motors Stella comes with the GEMC UniHUD. Touch the vehicle to bring up the menu and click the 'get HUD' button to receive it. Read more about the UniHUD.
Menu
Touch the Stella to bring up the menu. Go to Vehicle tab to change the vehicle settings:
Repair
The engine can sustain damage while driving. For example when revving the engine to it's redline for a long period of time. Depending on the damage level a repair or major repair is needed.
- Fuel: The Stella uses GFS regular fuel. Get your free fuel pump or gas can here. You can turn the fuel system on and off: go to the menu --> Vehicle --> Fuel System
- Engine: Touch and briefly hold the start/stop button on the dashboard to turn the engine on and off.
- Gears: the Stella comes with an automatic gearbox. To change the gear, use the E/C or PageUp/PageDown buttons.
- Passengers: there's place for 3 passengers in the Stella. Right click the passenger door and select 'drive' from the pie menu to sit in the passenger seat.
HUD
The Lusch Motors Stella comes with the GEMC UniHUD. Touch the vehicle to bring up the menu and click the 'get HUD' button to receive it. Read more about the UniHUD.
Menu
Touch the Stella to bring up the menu. Go to Vehicle tab to change the vehicle settings:
- Connect HUD: to (re)connect to the UniHUD, use this feature
- Diag data: shows vehicle data in chat
- Bad roads fix: use this setting when you can't drive certain mesh roads
- Set name: change the vehicle's name
- Handbrake: enable or disable the automatic handbrake. Useful when stopping on a hill
- Fuel system: turn the fuel system on or off
- Limiter/cruise: switch between a speed limiter or cruise control
- SpeedLimit+/SpeedLimit-: increase or decrease the speed limit
- Turn ratio: change the turn radius, useful for urban sims with many 90 degree turns
- Auto shut off: turn this off to leave the engine running when exiting the vehicle
- Smart Brake
Repair
The engine can sustain damage while driving. For example when revving the engine to it's redline for a long period of time. Depending on the damage level a repair or major repair is needed.
Interior vehicle controls
Many of the vehicles' functions can be controlled from the interior buttons (and from the UniHUD as well). Find out which buttons are functional and what they control.
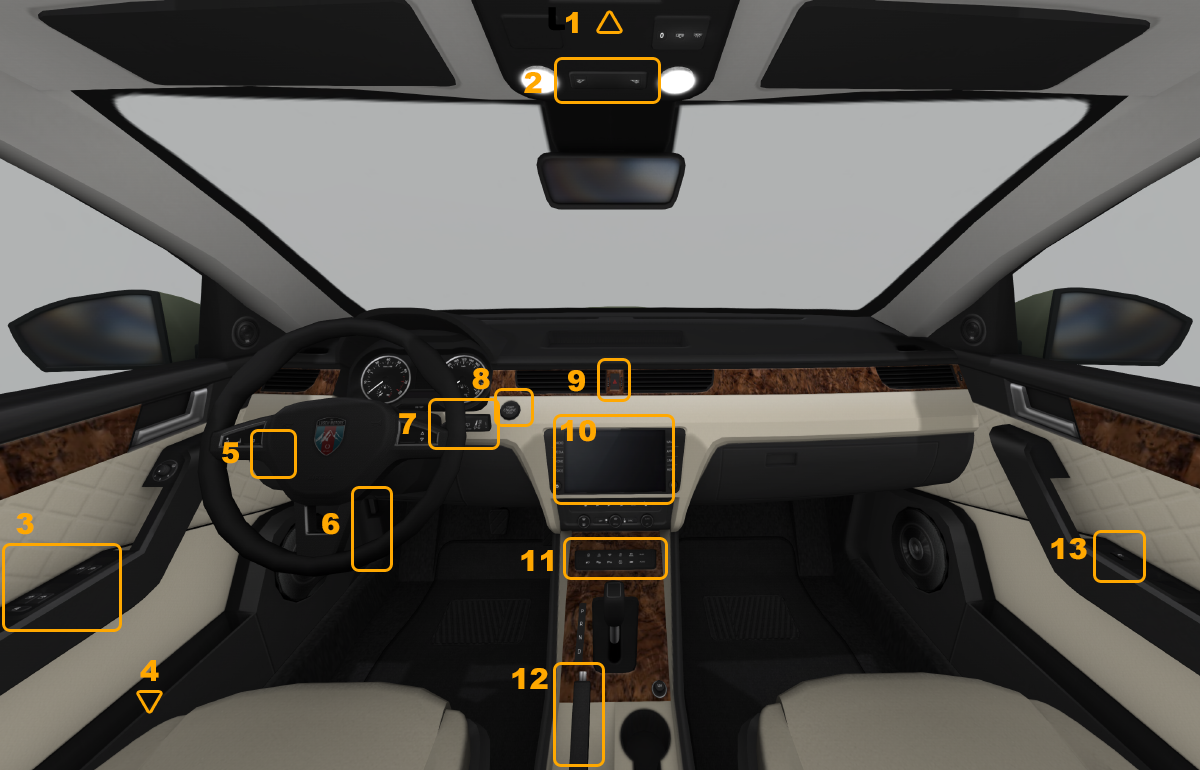
- Sunroof control
- The Sunroof can be either tilted or opened. if you operate it from the inside, click the side of the sunroof button that's close to the windshield to tilt the sunroof, and the other side to move back and forward. If you're using the latter, you can click and hold the sunroof button to make the sunroof stop when you release the mouse key. If operated by the UniHUD, it'll go all the way.
- The Sunroof can be either tilted or opened. if you operate it from the inside, click the side of the sunroof button that's close to the windshield to tilt the sunroof, and the other side to move back and forward. If you're using the latter, you can click and hold the sunroof button to make the sunroof stop when you release the mouse key. If operated by the UniHUD, it'll go all the way.
- Interior ceiling lights
- Touch the buttons to manually turn the interior dome light on/off
- Touch the buttons to manually turn the interior dome light on/off
- Driver window buttons
- Open/close all four windows on the car
- Rear doors window controls can be disabled by the corresponding button on the driver's door.
- Driver seat memory buttons
- Drivers seat has 3 memory buttons. Adjust your seat using the UniHUD, then press "Set" button on its side, and then press one of the numbered buttons to record the seat position to that particular button.
- Press one of the numbered buttons to make seat go to pre-recorded position.
- Light switch
- Off/Auto/Parking/Running lights/High beam
- Off/Auto/Parking/Running lights/High beam
- Bonnet release lever
- Windscreen wiper stock
- Start/Stop engine button
- Hazard lights button
- Media screen
- Buttons panel
- Lock doors button
- AUX buttons
- Foglights
- ECO mode
- Handbrake lever
- Passenger window buttons
Customization
The Stella is fully modifiable (except the scripts). A lot of customizations can be done through the menu to minimize the risk of breaking things. Touch the vehicle to bring up the menu and select Customize.
1. Body textures (colors/themes)
The Stella comes with a number of premade uniform body colors and liveries.
2. Custom body livery (texture)
You can apply your own, unique body texture. Find the templates here.
3. Details
4. Interior
5. Wheels
Switch between the different wheel styles.
6. Window tint
Choose between a darker and lighter window tint.
7. Decals
The Stella comes with one decal spot: on the side doors. Apply or remove the decal here.
8. License plates
This vehicles uses NTBI's Global License Plate System (GLPS).
1. Body textures (colors/themes)
The Stella comes with a number of premade uniform body colors and liveries.
- Plain colors: uniform body colors
- Themes: pre-made liveries
2. Custom body livery (texture)
You can apply your own, unique body texture. Find the templates here.
3. Details
- Sunroof: show/hide sunroof
- Wing: show/hide trunk wing
- Taxi sign: show/hide roof taxi sign. Turn the light on/off using the AUX1 button
- Luggage: show/hide trunk luggage
- Roof rails: show/hide roof rails
- Roof box: show/hide roof box. This automatically shows the roof rails and hides the sunroof
- Drink: show/hide drinks in the middle console
- Dashcam: show/hide dashcam
- Grille: choose a grille style
4. Interior
- Select an interior color style
- Select only the ceiling color
- Select a dashboard trim style
- Show/hide the floormats
- Switch between KM/h and MPH dashboard gauges
5. Wheels
Switch between the different wheel styles.
6. Window tint
Choose between a darker and lighter window tint.
7. Decals
The Stella comes with one decal spot: on the side doors. Apply or remove the decal here.
- The door decal has a 2:1 ratio (WxH)
8. License plates
This vehicles uses NTBI's Global License Plate System (GLPS).
- Size: switch between European or US sized plates: go to the menu --> Customize --> Plates --> EU/US size
- Text/letters: you can set your own text and/or letters on the plate: go to the menu --> Customize --> Plates --> CustomPlate. Type the text/letters you want on your plate. There's a limit of 7 characters
- Text/letters color: change the color of the custom text/letters: go to the menu --> Customize --> Plates --> Plates color. Choose any of the present colors or add your own.
- Background picture: Apply your own licenseplate texture: go to the menu --> Customize --> Plates --> Image EU / Image US. Use the texture's UUID.Details
- Advanced editing: see the link to GLPS for advanced editing and a list of pre-made templates
Editing
We've tried to make this vehicle as bullet-proof as possible, but given it's modifable nature, there might be certain cases in which it will fail to perform properly after being modified unprofessionally. Such cases are eligible for receiving customer support at our discretion.
IMPORTANT:
Please turn "EDIT MODE" on before any modifying that isn't reflected in vehicle's "Customize..." menu.
EDIT MODE can be turned on and off in the main menu (just click the vehicle).
Additional prims
Additional prims can be attached to vehicle's doors trunk and bonnet. They can have any rotation, position, and size. You can attach any number of prims(within sane limits).
Add ADDON_DOOR_FL, ADDON_DOOR_FR, ADDON_DOOR_RL, ADDON_DOOR_RR, ADDON_TRUNK and ADDON_BONNET to prims descriptions to make them move with corresponding element. You still can use your addon prims descriptions to store additional data, just make sure that ADDON_* identifiers are placed first, I.E. ADDON_DOOR_FL LIGHT|SIDE|<1,,1,1>1.
Custom wheels
You can replace the wheels with custom ones, as long as they are 1 prim each and regardless of their rotation, and without having to change any numbers.
How to:
1 - Set your car straight.
2 - Enable "Edit mode" via vehicle menu.
3 - Unlink current wheels and link yours.
4 - Set correct descriptions on your wheels (WHEEL_FL, WHEEL_FR, WHEEL_RL, WHEEL_RR)
5 - Turn off "Edit mode". It's done.
Wheel camber
- Camber setting gets reset to zero when enabling the "Edit mode". Make sure you only use the menu options to adjust camber. Adjusting it manually will result in unexpected results.
- Edit mode and all the car rotation steps can be skipped if you're sure you can set wheels straight on your own.
- If you're planning to skip the Edit mode when editing the wheels, make sure the camber on new wheels matches the old ones.
Global Mod Link System (GMLS)
The Stella has NTBI's GMLS system built in. This makes attaching addons easy. Read more about GMLS and how to use it here.
The GMLS CarID = LUSCH_EUROSEDAN2021_BASE
Updating using update loader
To ensure you're using the most recent version of the Stella you have two options:
1. Rezzing a brand new version (verify the car's version in the description bar) and customize it the way you like it;
or
2. Update a customized car using the update loader;
If you choose option 2, you have to use the object 'Lusch Motors - Stella v1.01 update loader'
1. Rezz the object 'Lusch Motors - Stella v1.01 update loader' near the Stella you'd like to update
2. Touch the update loader. It will ask permission to update the nearest Stella, click 'yes'
3. Wait for the update process to finish. You'll see a green text floating above the vehicle with further instructions
4. Follow those instructions and you've successfully updated your vehicle
5. Once the update process is finished, the update loader will automatically delete itself
Follow the instructions above for each vehicle you'd like to update.
Credits
Modeling and textures: Owen Lusch
Scripting, sounds and animations: Beckhan Ra for GEMC
Testing: GEMC Testers group
Modeling and textures: Owen Lusch
Scripting, sounds and animations: Beckhan Ra for GEMC
Testing: GEMC Testers group
